Sunday, 3 May 2009

week 9

Assigned tasks
  1. add new models and design works from designer in to the game
  2. work on shadows
During this week I mainly concantrated on adding materials from designers in to the game.
However through out the end of the week , Added some shadows in the terrain as well.

Week 10

assigned tasks.
  1. add remaining materials from designers
  2. create a endGame Gui with Restart and Quit buttons
  3. make the light holder model invisible.
  4. Make sure game ends if the guard caches the player

Task 1 :
Since there were no new materials, I couldn't do anything on this task. Probabily we have to do remaining bits on next week.

Task2:
Created an endGAme gui displayed for ending the game. When the time runs out or when the player cought by a guard, game would be over. I also made sure that player could restart the game after clicking a retry button.

Task3:
I worked on maya to make the light holder shape for player character invisible. I added the transparant texture on top of the model.

Task4:
Created a oncollision function and checked if the collided object is A.I guard. If it is true, I called the endGame Gui for ending the game .

Saturday, 2 May 2009

How to: Add models in to the engine as static shapes

There are two ways we can add models in to the game
As tsStatic shapes which inherits from sceneobject class or/and
As stacicShape which inherits from ShapeBase class

putting the models as tsStatic shape is an easy job. All we need to do is put the models in to the data folder and engine will recognise these models for us.

For static shapes its a bit more work. We need to make sure that each model has a static shape data block. Hence every object created from this datablock becomes a staticshape and inherites everything from its parent classes.

I put the all static shape data folders in to the staticShapes.cs folder, located at server/scritps.

// celtic building (not an interior)
datablock StaticShapeData(celticBuilding)
{
category = "Celticbuildings";
shapeFile = "~/data/shapes/buildings/hut.dts";
};

datablock StaticShapeData(romanBuilding1)
{
category = "romanBuildings";
shapeFile = "~/data/shapes/buildings/Building1.dts";
};
datablock StaticShapeData(romanBuilding2)
{
category = "romanBuilding";
shapeFile = "~/data/shapes/buildings/Building2.dts";
};
datablock StaticShapeData(romanBuildingData)
{
category = "romanBuilding";
shapeFile = "~/data/shapes/buildings/Building1.dts";
};

datablock StaticShapeData(romanBuildingData2)
{
category = "romanBuilding";
shapeFile = "~/data/shapes/buildings/romanbuild1.dts";
};

//torch for building shapes
datablock StaticShapeData(torchStaticShape)
{
category = "torch";
shapeFile = "~/data/shapes/lightHolder/torch.dts";
scale = "5 5 5";
};
// light holder shape used for mounting to player
datablock StaticShapeData(playerLightHolder)
{
category = "lightHolder";
shapeFile = "~/data/shapes/lightHolder/lightHolder.dts";
};

datablock StaticShapeData(fortressWall)
{
category = "fortress";
shapeFile = "~/data/shapes/buildings/fort.dts";
};
datablock StaticShapeData(marketTent)
{
category = "market";
shapeFile = "~/data/shapes/buildings/markettent.dts";
};

datablock StaticShapeData(seat)
{
category = "seat";
shapeFile = "~/data/shapes/otherModels/seat1.dts";
};
datablock StaticShapeData(table)
{
category = "table";
shapeFile = "~/data/shapes/otherModels/table1.dts";
};
datablock StaticShapeData(cart)
{
category = "cart";
shapeFile = "~/data/shapes/otherModels/cart.dts";
};
datablock StaticShapeData(stable)
{
category = "stable";
shapeFile = "~/data/shapes/buildings/stable.dts";
};
datablock StaticShapeData(fence)
{
category = "cart";
shapeFile = "~/data/shapes/otherModels/fence.dts";
};
datablock StaticShapeData(temple)
{
category = "stable";
shapeFile = "~/data/shapes/buildings/temple2.dts";
};
datablock StaticShapeData(amphi)
{
category = "stable";
shapeFile = "~/data/shapes/buildings/colis.dts";
};


our work with the staticShapes.cs is done. Now we need to execute this script to compile.
In order to do that all we need is add a single line of code in game.cs file located at server/scripts
exec("./staticShapes.cs");
Now we can see these data blocks in world editor creator and create static shapes.

How to: Add intro and cutscene as OGM/OGG format

Creating a IntroGui to display the intro scene
Firstly , I need to create a gui to display the intro scene. In order to be able to play OGM or OGG movie i need to use the gui controller named GuiTheoraCtrl.

theoraFile attribute used for locating the media file which I am going to use in our intro. Next thing I need to do create some functions to load the introGui and end the playback once the media finishes.I will be adding all these codes in to the intro.Gui

First function which i will be creating is loadIntroGui. As anyone can guess it will be used to load the introGui.


This function will be called from chechStartUpDone function scripted in StartUpGui. Which located at gameDirectory/client/ui


I also need to create a method which stops the playback and load the main menu Gui.


Now there is a problem which we have to look in to. How can we know when to stop the playback? So far , I couldn't find any information regarding to this. Then I thought i could schedule(delay) to this function call based on the time frame of the video. in simple terms, if the video is 6 second long then I could be able to schedule the function call to 6 second. Luckly schedule function already comes with the engine.


Our Intro is done. Now we can move on to cut scene.


Creating CutSceneGui to display cutscene movie

same as above, first thing I need to do is create a GuiTheoraCtrl and functions to load the gui.
Following pic showing the code is a bit long. For clear view just click on the pic.


Now our Gui is done we need to concentrate on how to activate this GUI in game. The simplest way is using the trigger. When the player gets in to the trigger we can call the loadCutSceneGui function. in order to create a trigger, first think I need to do is create a trigger data block and onEnterTrigger function to load the gui.


there are some additional things I have done in onEnterTrigger().
firstly, I stoped the game sound then paused the countdown.
and I eventuallyfreeze the game play by using $timeScale variable. This call absolutely necessary otherwise, while the movie playing the game will still continue under the canvas(game window)
The rest of the code used for loading the gui after we enter in to the trigger.

Placing the movieTrigger in to the game world
We now need to place the movie trigger in to the game. We can modify the mission file or alternatively we can use the world editor in game.

I am going to use world editor so that I can see what I am doing.
- start the game as usual
- once the game starts press on f11 to bring world editor
- choose world editor creator from the window toolbar
- find the trigger sim object from mission object\ mission sim group and click on it.
- Building Object Trigger pop up window will display on screen. choose the movie trigger datablock which we defined. Now we have a movie trigger in game world.
- scale/place it as you prefer.

Converting Avi to OGG/OGV (Additional)

There is a convertor which we can use to convert avi format to ogv format. the program is called ffmep2Theora and its downloadeble from;
http://v2v.cc/~j/ffmpeg2theora/

This program, works only in command prompt.
In order to conver the avi video;
- put the avi in to the directory ffmpeg2theora folder.(in my pc i use "C:\documents and Settings\school
- now in command prompt type the name of the program followed by space, followed by the name of the avi (with its extension). as an example lets say the avi format I am going to convert is named cutscene. So i need to type: ffmeg2theora cutscene.avi

How to: end game when caught by Guards

Ending the game if a guard catches the player

Torque engine comes with a console method called onCollision. This is the function which I will be working on.

In the game we will be colliding with many objects.Hence, if I am going to use this function i need to know what I am colliding with. One way i can do this is the check the collided object and see what kind of datablock it is based on. collided object has to be defined with a datablock other wise wont work.

after studying of the code, I found that the datablock used for A.I guards is AIPlayer. The data block scripted in player.cs (located at gameDirectory/server/scripts). I will also define the oncollision function inside the player.cs file


next thing i need to do is create a way to end the game. I will be checking the $isBeenCought variable. if it is true it will end the game.

The repeatTillQuit function has been discussed in how to add count down timer. I need to modify this function further to end the game if the player get caught. I prefer this function just because it is recursive. The function scheduled to call it self every one second. Basicly I can check the status of the game in every one second.


Note that i also add if else statement to see if the game ends as a result of running out of time or being caught by a guard. By using if else statements, i can change the background images and screen writing based on the way the game ended.

How to: add teleportation triggers

The teleportation scripts are not the result of a hard work of my side.Most of the code has been provided from garage games community. All I had to do was modify it as I needed. Here is the link forthe tutorial.I just found a tutorial regarding to that and modified it four our game. Resource can be found from the following link;
http://www.garagegames.com/community/forums/viewthread/34506


Here is my modified version of teleportation trigger data blocks and functions (all scripted inside
http://www.garagegames.com/community/resources/view/7532

$scene0="starter.fps/data/missions/caerleonRomanCity.mis";// loading second mission area romanCity
$scene1="starter.fps/data/missions/caerleonFortress.mis";// loading third mission area fortress
$scene2="starter.fps/data/missions/caerleonHillTop.mis";// loading first mission area hillTop
$scene3="starter.fps/data/missions/caerleonCelticCity.mis";// loading forth mission area celticCity
$currentScene = $scene2;

// creating teleport triggers for romanCity mission

//from celticCity to romanCityS point
datablock TriggerData(toRomanCityS)
{
tickPeriodMS = 100;
};
//from romanCity to fortress West point
datablock TriggerData(toFortressW)
{
tickPeriodMS = 100;
};
//from romanCity to celticCity Norht point
datablock TriggerData(toCelticCityN)
{
tickPeriodMS = 100;
};
datablock TriggerData(toRomanCityN)
{
tickPeriodMS = 100;
};

datablock TriggerData(toRomanCityNW)
{
tickPeriodMS = 100;
};

//from hilltop to fortress entrence
datablock TriggerData(toFortressN)
{
tickPeriodMS = 100;
};


//creating teleport triggers for hillTop mission
//from romanCity to hillTop
datablock TriggerData(toHillTopSouth)
{
tickPeriodMS = 100;
};

datablock TriggerData(toHillTopSouthW)
{
tickPeriodMS = 100;
};

//creating teleport triggers for fortress mission
//from fortress to hillTop
datablock TriggerData(toHillTopSouthE)
{
tickPeriodMS = 100;
};

//from fortress to romancity
datablock TriggerData(toRomanCityE)
{
tickPeriodMS = 100;
};

//function for teleporting from celticCity to romanCitySout Point
function toRomanCityS::onEnterTrigger(%this,%trigger,%obj)
{
Parent::onEnterTrigger(%this,%trigger,%obj);
LoadingGui.setBitmap("starter.fps/client/ui/cityImage");
LaunchMission($scene0, "romanCitySPoint");
$currentScene = $scene0;
pauseCountdown();


}
//function for teleporting from fortress to romanCityWest Point
function toRomanCityE::onEnterTrigger(%this,%trigger,%obj)
{
Parent::onEnterTrigger(%this,%trigger,%obj);
LoadingGui.setBitmap("starter.fps/client/ui/cityImage");
LaunchMission($scene0, "romanCityEastPoint");
$currentScene = $scene0;
pauseCountdown();
}

//function for teleporting from romanCity to fortressWest Point
function toFortressW::onEnterTrigger(%this,%trigger,%obj)
{
Parent::onEnterTrigger(%this,%trigger,%obj);
LoadingGui.setBitmap("starter.fps/client/ui/fortressImage");
LaunchMission($scene1, "fortressSPoint");
$currentScene = $scene1;
pauseCountdown();
}
//function for teleporting from romanCity to celticCityNorth point
function toCelticCityN::onEnterTrigger(%this,%trigger,%obj)
{
Parent::onEnterTrigger(%this,%trigger,%obj);
LoadingGui.setBitmap($scene3);
LaunchMission($scene3, "celticCityNorthPoint");
$currentScene = $scene3;
pauseCountdown();
}

//function for teleporting from romanCity to hillTopSouthWPoint
function toHillTopSouthW::onEnterTrigger(%this,%trigger,%obj)
{
Parent::onEnterTrigger(%this,%trigger,%obj);
LoadingGui.setBitmap("starter.fps/client/ui/hillTopImage");
LaunchMission($scene2, "hillTopSouthWPoint");
$currentScene = $scene2;
pauseCountdown();
}
//function for teleporting from romanCity to hillTopSouthPoint
function toHillTopSouth::onEnterTrigger(%this,%trigger,%obj)
{
Parent::onEnterTrigger(%this,%trigger,%obj);
LoadingGui.setBitmap("starter.fps/client/ui/hillTopImage");
LaunchMission($scene2, "hillTopSouthPoint");
$currentScene = $scene2;
pauseCountdown();
}
//function for teleporting from fortress to hillTopSoutEhPoint
function toHillTopSouthE::onEnterTrigger(%this,%trigger,%obj)
{
Parent::onEnterTrigger(%this,%trigger,%obj);
LoadingGui.setBitmap("starter.fps/client/ui/hillTopImage");
LaunchMission($scene2, "hillTopSouthEPoint");
$currentScene = $scene2;
pauseCountdown();
}

//function for teleporting from hillTop to romanCityNorthW point
function toRomanCityNW::onEnterTrigger(%this,%trigger,%obj)
{
Parent::onEnterTrigger(%this,%trigger,%obj);
LoadingGui.setBitmap("starter.fps/client/ui/cityImage");
LaunchMission($scene0, "romanCityNWPoint");
$currentScene = $scene0;
pauseCountdown();
}

//function for teleporting from hillTop to romanCity North point
function toRomanCityN::onEnterTrigger(%this,%trigger,%obj)
{
Parent::onEnterTrigger(%this,%trigger,%obj);
LoadingGui.setBitmap("starter.fps/client/ui/cityImage");
LaunchMission($scene0, "romanCityNPoint");
$currentScene = $scene0;
pauseCountdown();
}

//function for teleporting from hillTop to Fortress North Point
function toFortressN::onEnterTrigger(%this,%trigger,%obj)
{
Parent::onEnterTrigger(%this,%trigger,%obj);
LoadingGui.setBitmap("starter.fps/client/ui/fortressImage");
LaunchMission($scene1, "fortressNPoint");
$currentScene = $scene1;
pauseCountdown();
}

function LaunchMission(%mission, %spawn, %timeout)
{
fadeScreenOutandIn(0,5000,5000,0);
if (!$Game::LaunchingMission)
{

$Game::NextMission = %mission;
$Game::NextSpawn = %spawn;
$Game::LaunchingMission = true;
schedule(5000, 0, "onLaunchMission");
}
}


function onLaunchMission()
{
$Game::LaunchingMission = false;
loadMission($Game::NextMission);
}


also changed the pickSpawnPoint function scripted in Game.cs folder to following code:

function pickSpawnPoint()
{
%groupName = "MissionGroup/PlayerDropPoints";

if ( $Game::NextSpawn !$= "" ) {

%spawn = nameToID( %groupName @ "/" @ $Game::NextSpawn );
$Game::NextSpawn = "";
if ( %spawn != -1 )
return %spawn.getTransform();
}

%group = nameToID(%groupName);
if (%group != -1) {
%count = %group.getCount();
if (%count != 0) {
%index = 0; //getRandom(%count-1);
%spawn = %group.getObject(%index);
return %spawn.getTransform();
}
else
error("No spawn points found in " @ %groupName);
}
else
error("Missing spawn points group " @ %groupName);

// Could be no spawn points, in which case we'll stick the
// player at the center of the world.
return "0 0 300 1 0 0 0";
}

How to: add count down timer


Modifying the GuiClockHud in engine

Torque engine comes with a timer function. In order to use this function, we need to create a Gui Hud in our play screen. The component which we going to use named as GuiClockHud. However there are some problems we need to consider.
GuiClockHud only used for counting upwards. It doesn’t have the functionality of count down timer. Also it doesn’t have a function for pausing the time while loading the mission areas. In order to fix this tiny problems we need to modify the actual C++ file used for GuiClockHud.

In garage games there is a tutorial already covering how to do this. http://www.garagegames.com/community/resources/view/4978
Basicly all of the code which we need for modification of the engine provided in above link.

So our first job is compiling the torque engine with a new GuiClockHud which provides a countdown , pause and unpause functionality.


Adding GuiClockHud in to Play screen

After we compiled our code we can display our countdown timer by adding a new Hud object in to our play screen gui. Our play screen named as CloakGui.All we need to do add the following lines for creating GuiClockHud.
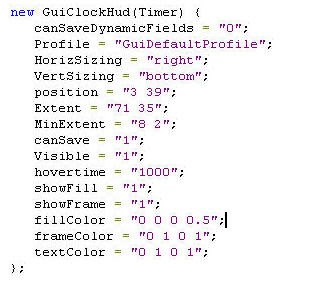


Displaying the countdown timer

First think we need to do is to set the countdown time by calling the setReverseTime function. In this case our CountDown gui named as Timer. We
can set the Time by adding “Timer.setReverseTime(600)” .

Now, we should be able to see the count down starting from 10 minutes.
However there is a design issue which we should consider. The Count down timer is more suited for games which takes place in modern times. More precisely, the count down timer doesn’t suite for ancient games like ours.

Modifying Countdown timer further with Torque Scripting
.

The way I approach this problem is not the best way . however with the limited knowledge I could only think of this for time being.

In order to make more ancient looking timer, I created 10 roman numerals which was suggested by Mike. All these numerals stored as jpg files in client/ui/romanNum.

Now all I need to do;
- create a GuiBitmap control which used for displaying the jpg files which been created .
- create function which reads the current time from the actual GuiClockHud which we previously created and change the bitmap of the GuiBitmap control with a correct jpg file.


Creating GuiBitmap Control

Again, we need to display the jpg files in Play screen therefore we need to add a
guibitmap control in Clock.gui.
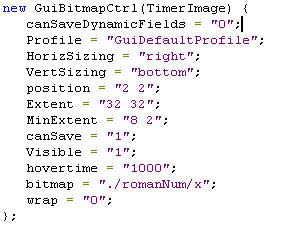


Creating a TimerImageList.cs file for our functions

The first function which I will be creating used for selecting correct jpg file and assigning to the GuiBitmapCtrl. The following snapshot displays the code for this function.


All those if statements are used for checking the current time and changing the bitmap image of the GuiBitmapCtrl which we created previously.


Keeping track of the countdown timer for ending the game and changing the bitmap Image
There are two thinks we need consider. The first thing we have to consider is keeping the track of the time so that when the countdown timer gets in to the next minute, it changes the current image of the Guibitmap control to the correct image.

The second thing we have to consider is ending the game if the timer reaches zero.
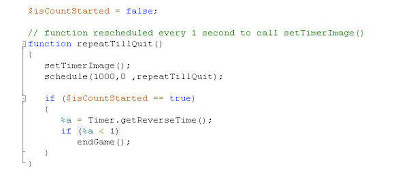


repeatTillQuit function keep repeats by calling itself. This function calls the setTimerImage function in it’s body.

I also add additional functionality which is used for ending the game. if the countdown reaches under one second, endgame function will be called to end the game.

Ending the game was a bit tricky task. Since the repeatTillQuit function will execute before the actual game starts, the count time will be equal to zero. Therefore, the game would end before even starts. In order to fix this problem, I created a global Boolean variable which used for tracking whether if the game is running or not running. If the game is not running, the endgame function will be skipped until the game starts.


Pausing and Unpausing the Timer.

Additionaly I created two funtions to pause and unpause timer. This is an important function which we could use when we loading the mission.
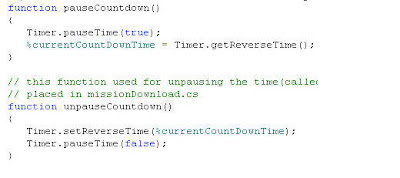


Setting up the executions and function calls

- add timerImageList.cs in to the execution list of the init.cs file located at client/scripts folder. We have to make sure that timerImageList.cs executes before the CloakGui. Other wise cloakGui won’t be able to find the function since it is not compiled yet.

- need to set the value of isCountStarted global variable to “True” after player enters the game. We can set the value in GameConnection::onClientEnterGame method.

- need to set the time limit and pause it at the same time when the mainMenuGui loads. We can use this gui for required function calls.

- need to unpause the timer right after missiondownload. Therefore, we need to call unpauseCountDown function in missionDonwloadComplete function which is defined in missionDownload.cs. Located at client/scripts folder.

- need to pause the timer when we enter in to teleportation triggers. Therefore we need to call pauseCountDown function in every function used for teleportation. All the teleportation functions placed in teleportTriggers.cs file located at server/scripts folder.

- need to reset the time and pause it if the game ends. This is important because if the game reloads after a while it will continue from old time.